Amazon Calling coming to Fire Tablets “Soon”.

13 05 2017

I was pleased to learn that the new Alexa app on our iPhone and Android phones is capable of making and receiving Amazon Echo Calls and Messages.

I updated all the apps on my 5th Gen Fire Tablet but the Alexa app is still the old app with old icon and menu structures and no ability to use Amazon calling functions.

After a fruitless search online I found no information on Amazon’s website or any news sites about support for Amazon Calling on Fire Tablets. I started a support chat session for my Fire Tablet and soon learned that the Alexa app on Fire devices will support Amazon Calling “Soon”. Amazon aren’t providing specific dates, but indicated its a priority for them.

I also asked about the website http://alexa.amazon.com and if it would support Amazon Calling. The support rep was a little more cagey and did not indicate that such functionality is being developed. The rep did say however that Amazon’s ultimate goal is to have Amazon Calling on any and every device.

You can read the transcript between myself and Amazon tech support here.

Part of my motivation to find out about this is that I hoped I could turn my Fire Tablet into a ‘poor mans’ Amazon View at no extra cost; just put it on a stand and make or receive calls. It sounds like they will certainly support audio on Fire Tablets. I’m not sure they will go as far as video calls on a Fire device as this will undermine View sales. However how cool would it be if you could make a video call using a Fire Tablet or even better your TV using Fire TV?

Advertisement


Live Streaming on a Budget

28 02 2016
Canon Camcorder on permanent mount

Canon Camcorder on permanent mount – click to enlarge See video below to see how the camcorder zooms.

Challenged with finding an inexpensive way to stream a church service to the internet with a shoe-string budget, I have arrived at a setup I believe is worth sharing that costs about $500 (if you use a existing desktop computer). Here is a video we streamed to YouTube recently…

The upfront cost to do this (assuming you already have a computer) is about $500. Monthly expenses are less than $10/month.

We realized that gamers are constantly streaming/recording their games to YouTube or other streaming sites and we’d do well to utilize the systems gamers use on a low budget. However gamers don’t need to record activity at a distance, its normally confined to a single room in a home, so we needed to find the right video capture device.

We did go through a variety of configurations and learned some valuable lessons.

Our final configuration

Here is the equipment and software we settled on

The Canon Vixia 600 camcorder was cheap since its a discontinued model, the current 700 series model will set you back $300.

Details of how we set it up

Camcorder and mount.

We chose to mount the camcorder on a fixed mount onto a wall in the media booth. Using a tripod on top of our work surface in the booth took up valuable space and the video image vibrated as media personnel went about their duties on the work surface. The Camcorder came with a HDMI cable to attach to the computers capture card. Since we are streaming only, no memory card is needed for the camcorder!

The Vixia camcorder can be configured to remember the last zoom position and can be left attached to a power source and the media computer at all times. It’s truly ‘set it and forget it’ once you have tweaked things the way you like it.

It was necessary to turn the microphone volume down to zero on the camcorder to avoid a hiss or any feedback.

The only thing media personnel need training on is where the on/off switch is for the camcorder.

Avermedia Capture Card.

The Avermedia capture card is installed into a PCI-Express Slot. It is a ‘1x’ PCI Express card so should fit any PCI-Express slot not just the smaller 1x slots. The card came with a nice array of cables, none of which we needed and comes with a 3 month subscription to XSplit, our chosen software for streaming to YouTube. For some reason the card comes without a driver CD and the card isn’t recognized by Windows. You’ll need to download the latest software and driver package from the Avermedia website. It was a painless install.

XSplit Broadcaster.

XSplit is free to try. Installation is easy enough.

Add the camcorder as a “source” for video and you are set for video capture.

XSplit can be configured to always source audio from the ‘microphone in’ on the computer – we have a cable that runs from the headphone jack on the soundboard to the computer microphone in. We record audio separately using Audacity for some projects when video isn’t needed, so we prefer not to connect the audio to the camera or video capture card directly.

YouTube Live

Resist the temptation to use a personal YouTube account and establish an account linked to the organizations main email address. Once established Live Streaming is activated by visiting “My Channel” and then “Video Manager”. Live streaming is an available option in Video Manager. Follow the “Live Stream Checklist” which guides you in the steps necessary to create a live stream feed on the YouTube account.

Under “Stream Options” there is a section for Encoder Setup. Copy the URL and paste it into XSplit to link XSplit to YouTube account. The option in XSplit is under the “Broadcast” menu.

We enable the DVR option under Stream options, which creates a permanent recording of all live streams.

At this point you should be setup to test the stream.

YouTube have a rudimentary editor that allows videos to be trimmed. As a rule we stream/record only the sermon. Music and videos will attract attention from copyright holders. Copyright violations could result in the account being terminated. Most often the rights holder allows the copyrighted content to be posted on YouTube and YouTube sells advertising space on top of your video. This will not happen if no copyrighted material is posted on YouTube.

The YouTube video editor is hard to use and is very basic. We encourage media personnel to start and stop the stream so that only the sermon is streamed and recorded therby eliminating the need to do any editing at all.

Our next steps – Multiple camcorders and mixing video

Our next step will be to install multiple cameras and capture cards so that we can switch between a close up or wide views. Currently the streaming is done on our main media computer. This is the cheapest option and makes things tricky for the media team.

Handling multiple cameras will require us to buy a dedicated computer for video. That will have to wait for funds to be available. XSplit has the ability to manage up to 16  video feeds, so video switching/mixing can be done all in one interface. It saves the need for a dedicated video switch hardware and allows multiple video feeds to be merged or overlay-ed.


Upgrading Intel Compute Stick to Windows 10

29 11 2015
Screenshot 2015-11-29 at 18.01.18

Intel Compute Stick

If you buy an Intel Compute Stick that comes with Windows 8.1 you may get prompted to upgrade to Windows 10 as you setup the device. DON’T!

Intel Compute Sticks have some flaws that will prevent a successful upgrade to WIndows 10 and also prevent you from rolling back to Windows 8.1. You will find yourself with a bricked Compute Stick. The “recovery Partition” that comes with the device is also faulty.

There is a way to do the upgrade without problems, here are the steps.

If you made the mistake of upgrading and your compute stick is non functional, scroll to the end of this article for recovery instructions.

Step 1 – Upgrade to the Latest BIOS for your Compute Stick

Compute sticks with a BIOS version prior to release 24 will fail and create a catch 22 situation with your upgrade. To upgrade your BIOS follow instructions at Intel’s website here.

Screenshot 2015-11-29 at 16.36.54

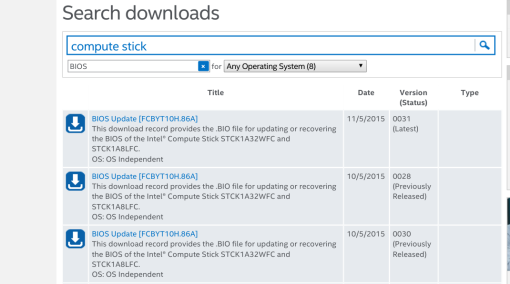
Be sure to select the latest version

Step 2 – Download WIndows 10 Upgrade Instructions from Intel

Download a very helpful PDF from Intel’s website located here.

Step 3 – Obtain Windows 10 Home Edition from Microsoft

The instructions will guide you through downloading an ISO image for WIndows 10 Home 32-Bit. Do not use the 64-bit version of Windows 10. Use a USB drive of 16GB or larger capacity.

Before copying the ISO to a USB drive be sure to format the USB first using NTFS partition type first. The 6GB ISO image will not copy to a FAT32 USB drive. FAT32 has a 4GB file size limitation.

Step 4 – DON’T install Windows 10 yet as instructed!!

First do the post install step of downloading new drivers for WIndows 10 and place them on your USB drive. This is important as you may not be able to connect to the internet if the wireless adapter driver fails under Windows 10.

The latest drivers can be located at Intel’s Website here.

Copy the drivers for Wireless, Bluetooth and Graphics Adapter to your USB drive.

Step 5 – Upgrade to Windows 10 as instructed

Now its OK to upgrade using your USB drive per the Intel instructions. Be sure to follow the instructions by the letter. Key points are

Attached USB Drive and reboot the system.

Don’t download updates as prompted by the Windows Update Process.

When prompted to choose what to keep when upgrading, be sure to select keep personal files only, even if it’s a brand new unit with no personal files on it.

Step 6 – Install the drivers you downloaded earlier.

I found it useful to download and run the Intel Driver Upgrade Utility. It takes the guess work out of selecting the right driver and finds others you may have overlooked.

Step 7 – Check Windows 10 is activated.

Press the WIndows Key and the letter I at the same time. Choose Update and Security.

Choose the option ACtivation option on the left hand menu to check your Windows Activation Status. If you are activated you are done.

Step 8 (Optional) – Reclaim 2GB of Lost Disk Space due to Upgrade

Windows retains a complete copy of your old windows 8.1 installation should you wish to rollback for any reason. This rollback is available for 28 days after initial installation. The disk space lost to the old installation is significant on the small 32GB disk drive Compute Sticks come with.

Download CCleaner from Piriform here.

Look at the advanced options and check “old windows installation” then click on clean. The cleaning process takes 4-5 minutes.

After cleaning is complete disable monitoring on the options tab after installing the CCleaner product.

Did your Compute stick get stuck upgrading before you came here?

To release your compute stick from its Catch 22 dilemma follow instructions at this intel community forum. The poster provides a total recovery image that does what the recovery partition fails to do on the original Compute Stick. The Intel forum will re-direct you to a support site for Hannspree and instructions for using the image are found in this PDF document


What to do if your Moto X (2013) battery life suffers after upgrading to Lollipop 5.1

19 09 2015
Moto X Battery Life 2 1/2 Hours!! Click to enlarge

Moto X Battery Life 2 1/2 Hours!!
Click to enlarge

Verizon Wireless has finally rolled out Lollipop 5.1 android operating system to the Gen 1 2013 Moto X phones. The upgrade went without a hitch but I noticed my battery life was only 2 1/2 hours with very light use. I left the phone plugged in overnight but the next morning the problem was still present. The phone was noticeably hot to the touch as well. Something was keeping the phone’s CPU very busy.

After asking on Google+ if anyone else had seen this problem, many had. I received various pieces of advice ranging from ‘do nothing it will fix itself’, to ‘you’ll need to do a factory reset’.

The best advice I received was to clear the cache partition.

Not knowing how to do this I did some research, performed the operation and now I have a much better phone as a result. I now get 9-10 hours battery life with normal use. If you are having similar issues, here is how to do the same for your Moto X phone to restore the phone to normal operation. (The operation is non-destructive you do not lose any data, applications, call logs. It’s one of the safest remedies you can perform).

Clearing Your Cache Partition

Full instructions can be found at this website.

I suggest you visit the site, the author did a really nice job showing screen shots etc of how to do the cache clear operation. Just incase the website disappears one day here is a quick checklist of the steps one needs to perform.

Step 1:  Power off your phone.

Step 2. Access boot options

Press and hold the volume down button for 4-5 seconds first.  Do not release your finger from the volume down button!

While still pressing and holding the volume down button, now press and hold the power button for 4-5 seconds (you are pressing and holding two buttons now).

Then release your fingers from both the power and volume  buttons.

Step 3: Boot into recovery mode

In boot options page (as shown above), you have to:

use volume down button to navigate;

use volume up button to select, NOT the power button as you may assume.

Do not use power button in boot options page. It will reboot the phone.

Now use volume down button to move the cursor to Recovery, then press volume up button to make the selection.

The phone should now boot into recovery mode.

Step 4: Access recovery mode menu – (this can be tricky, the time you have the power button pressed is critical)

Once you get the dead Android, you must:

  1. press and hold power button for about 2-3 seconds. Don’t hold this for to long!!
  2. without releasing power button, press volume up button and quickly release the volume up button.
  3. quickly release the power button button.

If the phone reboots, it means you hold the power button too long. 

Step 5: Clear cache partition

In recovery mode menu, use volume down or volume up  button to navigate to “Wipe cache partition” .

Then use the Power button to select it. This is different from step 3.

After selecting the wipe cache partition, your phone will start to wipe all cache files in the cache partition. This operation can take 5 minutes or more so be patient. WHen it is complete it will return to the recovery mode menu.

Step 6: Reboot the phone

You can select Reboot system now from the recovery mode menu.


Installing Google Chrome on Knoppix 7.4 Persistant

9 11 2014

Knoppix 7.4 comes with the IceWeasel browser. Awesome name, but I really prefer Google Chrome.If you have a persistent version of Knoppix on a thumb drive or hard drive then there are few steps you have to go through to install Google Chrome.

1. Download 32-bit Debian version of Google Chrome. Just go to google.com in IceWeasel and search for chrome browser. The download will be saved in the downloads folder automatically.

2. Install Google Chrome

Open a terminal window using the tool bar.

Type CD Downloads. (Yes capitalization is important).

Type SUDO DPKG -i <Package name>

where <package name. = the name of the downloaded file.

at the time of writing the command is

SUDO DPKG -i google-chrome-stable_current_i386.deb

During the install you will see an error about libappindicator1 not being installed.

3. Fix dependencies using Synaptic Package Manager

In your terminal window type

SUDO synaptic

Ignore prompt to fix broken packages.

Click on the search button and type

libappindicator1 and press enter

Right click the application package libappindicator1 and mark for installation.

Click apply changes.

Done!!

Google Chrome will now be in your “Internet” Menu. Login with your gmail credentials and all extensions will automatically install. If you use hangouts, it will install a hangouts application and place it in the system tray.


Correcting TurboTax Update Error ‘File cannot be found in cabinet file TurboTax.cab’

11 02 2012

Should you receive the following error during TurboTax Program Update

Error after rebooting PC and starting TurboTax 2011

You find yourself unable to open the program anymore to get any further help or updates. The only way to correct this problem is download a manual update file from Intuit’s website. Be sure to pick the correct year and computer operating system. In my case this was 2011 and Windows.

After running this manual updater TurboTax operates correctly once more.

This tax season has been technically challenging. I first discovered that H&R Block TaxCut software did not support electric vehicle credits. I got a refund for TaxCut and purchased Turbo Tax instead. Then my install of TurboTax failed, requiring some fancy foor work to overcome until Intuit posted a resolution. That was followed by my return being rejected by the IRS because TurboTax did not submit all pages of a multi part form, that was part of my schedule C filing. The most recent update failed as described above, but I finally overcame what I hope to be the last hurdle to getting my $7,500 tax credit for the Nissan  LEAF I purchased last year.

I have re-transmited my taxes via e-file once more and await the response from the IRS.


TurboTax 2011 Unrecoverable error – The Better Fix

4 02 2012

Click to enlarge

Turbo Tax 2011 has had problems installing on some Windows 7 computers. They have identified the problem is caused by corrupt versions of Arial and Verdana fonts on some Windows 7 systems.

Intuit have posted some rather long winded and complicated instructions that help recover from the problem. The average computer user would have problems following these instructions. Even worse than that, the fix does not work for all  instances of this problem. The fix did not work for me.

I found a much easier procedure for fixing corrupt font problems on a windows 7 computer, after which TurboTax 2011 installs just fine.

If you get the unrecoverable error installing Turbo Tax 2011 do the following to fix the problem.

Click on Start and then in the search box type

c:\Windows\Fonts\Arial.ttf
(be sure to hit enter after typing this in)

Then click on the ‘install’ button.

Click Install to recover corrupt font


Repeat the procedure for the Verdana Font.

c:\Windows\Fonts\Verdana.ttf 
(be sure to hit enter after typing this in)

and click the instal button once more.

TurboTax 2011 should now install without problems.

This fix should work for Windows Vista systems as well, though I haven’t verified it does.


Overcoming TurboTax 2011 Unrecoverable error during install

16 01 2012

Click to enlarge

I got TurboTax this tax season but was greeted with an error message before I could even get the install past the first step. TurboTax  reports an error

Turbotax installation has encountered an unrecoverable error. Would you like more information on this error?

Clicking on the more info button take you to  an Intuit knowledgebase, where they acknowledge that this error occurs sometimes and one can register to be informed when a a fix is posted.

(Update 2012-02-04 Intuit have indentified the problem – read more here)

I really needed to get a jump on my taxes this year. H&R Block Taxcut software did not contain the forms necessary for me to claim my Electric Vehicle credit, so I turned to TurboTax only to get this error. Rather than wait for Intuit to post a  fix, I overcame the error by installing the software instead onto a XPMode virtual machine. If you encounter the TurboTax error and have Windows 7 Professional or better then XP Mode is your workaround.

To install XP Mode Read the rest of this entry »


Google’s Two Step Verification – Why everyone needs to use it

15 03 2011

Google Authenticator Logo

Google have introduced a new feature called 2-step verification. To learn the basics read the Google Guide.

Why you Need it

This feature is a must have security feature that should make it very difficult for anyone to hack into your Google account, which is much more than simply your email. Google has a slew of products that you maybe using that store detailed personal information about you. Protecting this information is important to prevent Identity Fraud

Using the 2-step verification ensures that only authorized computers/devices will accept your Google password therefore restricting access to your Google email and other data. If someone finds out Read the rest of this entry »


How to register an orphaned AT&T 92370 handset to a different base station

9 03 2011
AT&T TL92370 Phone System

AT&T TL92370 Phone System

Lightening recently damaged my AT&T Home Telephone Answering system base station rendering the 3 cordless handsets useless. I purchased an identical Telephone system that comes with 3 handsets and hoped to reuse the handsets fom the old system on the new.

Problem

The AT&T TL92370 base station can support up to 12 handsets. However as I read through the instructions on registering and deregistering handsets, it became apparent that to deregister a handset from the base station one needed a working base station to do so. The handsets once registered to a base station cannot be registered to another until they have been released from the original base station. The orphaned handsets displayed the following message

Out of range OR No power at base

I searched in vain on the net looking for a way to remedy this. I diassembled one of the hansets hoping to find a reset switch. No such luck. I was now the proud owner of 3 orphaned handsets I could not use.

Resolution

I sent an email to AT&T asking how to accomplish this. I got a boilerplate response informing me that my problem was too complicated for email resolution and to call 1-888-883-2442 to speak to a tech. I called using Skype. It took about 8 minutes on hold before I got through to a live tech. He asked basic questions and did understand my problem first time. He put me on hold and came back with the folowing code to enter into the old handsets.

*331734# followed by menu/select

The phone beeps twice, reboots and then comes back up ready to register to a new base station.

Registering to the new base station is now easily accomplished using the standard instructions.

  • Press and hold handset locator on base station until ‘in use’ light comes on.
  • Press # on the handset and the phone registers itself to the base station.

I repeated the above procedure with my two remaining handsets and now I have a 6 handset cordless system for my home.

It’s important to note that if you have a working base station you should use the standard instructions for deregistering the handsets. Each handset gets allocated a handset number by the base station, if you deregister using the special code detailed in this post then the reserved handset number on the base station is consumed and cannot be reclaimed; thus reducing the number of handsets the base station can support by 1. The special code is only for use when you have a handset that is orphaned from a lost or  non-working base station.